The Power of App Shortcuts 💪🏻

Add App shortcuts and Quick actions to your Flutter app and give power to your users.
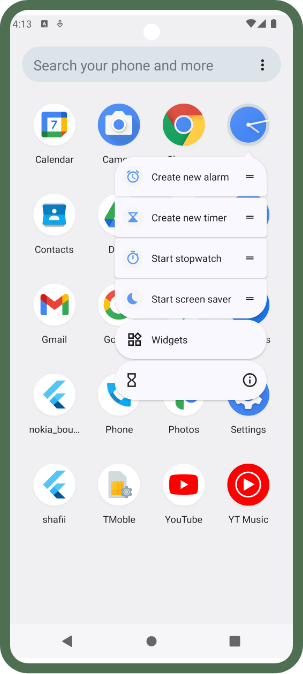
In this article, we will integrate App shortcuts (android) and Quick actions (iOS). This allows users to quickly access your app primary features/actions. Reducing multiple clicks and friction and making your app a seamless experience.
We will also explore ways how to control Quick action remotely so we can change them on the fly. And also how to remove them if needed.

🔗 Read about App shortcuts here: https://developer.android.com/develop/ui/views/launch/shortcuts
🔗 Read about Quick actions here: https://developer.apple.com/design/human-interface-guidelines/home-screen-quick-actions
Setup ⚙️
We will use the official Flutter plugin to add Quick actions to our app. Add the package to your pubspec.yaml file.
dependencies:
  flutter:
    sdk: flutter

  quick_actions: ^1.0.6
Create model class 🛠️
Let’s create a model class that will make it easier for us to use Quick actions. The purpose of the class is to store action properties like title, ID, icon etc.
class Action {
  Action({
    this.id,
    this.title,
    this.iconName,
    this.dynamicLink,
  });

String? id;
  String? title;
  String? iconName;
  String? dynamicLink;
}
id will be used to uniquely identity the action.
title will be the action name shown in the UI.
iconName is the asset name that is already added in app.
dynamicLink will be used to redirect the user to a specific location in app.
Define app actions ⚡️
Let’s use the above model and create our app actions. We will create a list of action and define properties for all of them.
var actionList = [
      Action(
        id: '1',
        title: 'Start Timer',
        iconName: 'action_timer',
        dynamicLink: 'yourAappDynamicLink://a',
      ),
      Action(
        id: '2',
        title: 'Start Stopwatch',
        iconName: 'action_stopwatch',
        dynamicLink: 'yourAappDynamicLink://b',
      ),
      Action(
        id: '3',
        title: 'Create Alarm',
        iconName: 'action_alarm',
        dynamicLink: 'yourAappDynamicLink://c',
      ),
    ];
The iconName is the name of the asset defined in Android under drawable and on iOS under xcassets. Keep name of asset same on Android and iOS.


The above will be used to generate a list of ShortcutItem define by quick_actions package. We will do that in the later part of the article.
Initialize Quick actions 🔄
We will create a singleton class to manage all the Quick action flows.
import 'package:quick_actions/quick_actions.dart';

class QuickActionsUtils {
  QuickActionsUtils._();
  static const _quickActions = QuickActions();
  static Future<void> init() async {

    _quickActions.initialize((shortcutType) {
      // on quick action click
      // Perform your logic here on action click
    }).then((value) {
      _setupShortcuts();
    });
  }
  static void _setupShortcuts() {
    var shortcuts = List.generate(
      actionList.length,
      (index) {
        var action = actionList[index];
        return ShortcutItem(
          type: action.id ?? '',
          localizedTitle: action.title ?? '',
          icon: action.iconName ?? '',
        );
      },
    );
    //Order shortcuts correctly for iOS
    if (GetPlatform.isIOS) shortcuts = shortcuts.reversed.toList();
    _quickActions.setShortcutItems(shortcuts);
  }
}
On iOS, the order of the shortcut is added in reverse, so we are reversing the list item to make both Android and iOS sequence same.
We have created an init() method to initialize our Quick actions using our previously defined Action model list.
The quick_actions package defines a ShortcutItem class to add a quick action. It takes multiple attributes, you can read more about it here.

Now we need to call the init() method at our app startup. The Quick action will start showing up after the 2nd app run.
void main() {

  runApp(const MyApp());
  QuickActionsUtils.init();
}
Handle action click 👆
We have added Quick actions for our app. Now let’s handle click behavior of our Quick actions. In the above Action class, we have defined a dynamicLink attribute which we will use to navigate to the desired place in our app.

To know more about dynamic link, you can check this: https://pub.dev/packages/firebase_dynamic_links
We have used dynamic link for navigation, but you can use any other approach according to your need.
static Future<void> init() async {

_quickActions.initialize((shortcutType) {
      // Handle quick action click
      // Perform your logic here on action click

      var shortcut = actionList.firstWhere(
        (element) => element.id == shortcutType,
        orElse: () => actionList.first,
      );

      //Executing dynamic link here. You can handle the
      //quick action as per your need
      ExecuteDynamicLink(
        dynamicLink: Uri.parse(shortcut.dynamicLink ?? ''),
      );
    }).then((value) {
      _setupShortcuts();
    });
  }
Clear Quick actions 🗑️
There can a scenario when we want to clear Quick action. We can easily clear using predefined method as follows.
static Future<void> clearAppQuickAction() async {
    await _quickActions.clearShortcutItems();
  }
We can use the above method as follows. You can use your custom logic when to clear Quick actions.
if(clearQuickAction) {
  QuickActionsUtils.clearAppQuickAction();
}
Remotely change Quick actions 🌐
To remotely control Quick action, we can move our Quick action list to our own server. The simplest way is to add the list in Firebase Remote Config.
After we have moved our action model list to a remote server, we can initialize the Quick action from the server. We can do this at app startup, so as soon as the app is opened, our quick action will be updated with new values.
Note: All icon assets need to be preloaded in build. If an icon is not defined, then an empty icon will be shown in the quick action.
Thank you, and I hope this article helped you in some way. If you like the post, please support the article by sharing it. Have a nice day!👋
I am an mobile enthusiast 📱. My expertise is in Flutter and Android development, with more than 5 years of experience in the industry.
I would love to write technical blogs for you. Writing blogs and helping people is what I crave for 😊 .You can contact me at my email(abdulrehman0796@gmail.com) for any collaboration 👋
🔗 LinkedIn: https://www.linkedin.com/in/abdul-rehman-khilji/


